
Cleaning a mechanical keyboard is simple when you use the right method. Start by powering it off, remove loose dust and debris, then clean the keycaps and keyboard surface without letting liquid reach the electronics. For a deeper clean, remove the keycaps, wash them separately, clean the exposed plate and switch area, and let everything dry completely before reassembly.
This guide explains how to clean a mechanical keyboard safely, whether you need a quick refresh or a full deep clean. It also covers water, isopropyl alcohol, sticky keys, spills, cleaning frequency, and common mistakes to avoid.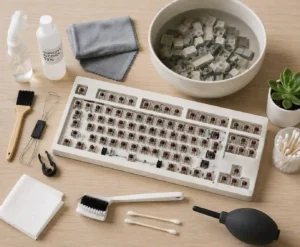
Quick answer: For routine cleaning, power off the keyboard, turn it upside down, remove loose debris, brush or vacuum around the keys, and wipe the keycaps with a barely damp microfiber cloth. For a deeper clean, remove the keycaps, wash them separately with warm water and mild soap, clean the exposed keyboard carefully, and reinstall the keycaps only after everything is completely dry.
How to Clean a Mechanical Keyboard
The safest method depends on how dirty the keyboard is. A light buildup needs only a few minutes, while a neglected keyboard may need keycap removal and several cleaning stages.
- Turn off and unplug the keyboard.
- Take a photo of the layout.
- Remove loose dust and debris.
- Remove the keycaps if a deeper clean is needed.
- Wash the detached keycaps separately.
- Clean the keyboard case, plate, and exposed areas.
- Dry everything completely before reassembly.
- Replace the keycaps and test every key.
You do not need to remove every keycap every time. A quick clean can keep everyday dust under control, while a deeper clean is useful when grime builds up around the switches.
Why Regular Mechanical Keyboard Cleaning Matters
A mechanical keyboard collects more than visible dust. Skin oils, hair, food crumbs, and other debris can settle between the keycaps and around the switches.
Regular cleaning keeps the surface more pleasant to use and makes it easier to spot problems before they become frustrating. It can also help prevent debris from interfering with keys that feel sticky or rough.
The best approach is consistency. A short routine clean is easier than waiting until the entire keyboard needs a deep cleaning.
What You Need to Clean a Mechanical Keyboard
You do not need an expensive collection of tools. Most routine cleaning jobs require only a few basic supplies.
Essential Cleaning Supplies
- Microfiber cloth: Use it for keycaps and the keyboard case.
- Soft-bristle brush: Use it to loosen dust and debris around switches.
- Keycap puller: Use a suitable puller when removing detachable keycaps.
- Small bowl: Useful for soaking detached keycaps.
- Mild dish soap: Suitable for cleaning many removable keycaps.
- Isopropyl alcohol: Useful for stubborn residue when the keyboard manufacturer permits it.
- Cotton swabs: Helpful for tight spaces and small areas with residue.
- Vacuum or suitable dust blower: Useful for removing loose debris.
Keep the cleaning tools separate from products used for household surfaces. Harsh cleaners can damage plastics, coatings, printed legends, or other keyboard components.
Before You Start Cleaning Your Mechanical Keyboard
Preparation prevents most avoidable cleaning mistakes. Before touching the keyboard, disconnect its power and clear enough space to work comfortably.
Turn Off and Unplug the Keyboard
Disconnect a wired keyboard from the computer before cleaning it. For a wireless keyboard, switch it off and follow the manufacturer’s instructions for removing or disconnecting its battery when necessary.
Never clean a powered keyboard with a wet cloth or free-flowing liquid. The goal is to keep moisture away from the switches, PCB, and other electronic components.
Take a Photo of the Keyboard Layout
Take a clear photo before removing the keycaps. The photo becomes a useful reference when you reinstall keys later.
This matters most with compact layouts and keyboards that use unusual key sizes. Large stabilized keys can also be confusing when several keycaps are sitting together on a desk.
Choose the Right Cleaning Level
Choose the simplest method that solves the problem.
- Quick clean: Use it for dust, hair, crumbs, and light surface grime.
- Standard clean: Remove keycaps when debris has collected underneath them.
- Deep clean: Use it for heavy grime, sticky residue, or a keyboard that has gone without cleaning for a long time.
How to Clean a Mechanical Keyboard Without Removing the Keycaps
Yes, you can clean a mechanical keyboard without removing the keycaps. This method works well for regular maintenance when the keys are not heavily soiled.
Step 1: Turn the Keyboard Upside Down
Hold the disconnected keyboard securely and turn it upside down over a clear work area. Gently shake it so loose crumbs and debris can fall out.
Do not shake aggressively. Small components and accessories can become loose on some keyboards.
Step 2: Brush Away Loose Debris
Use a soft brush to loosen dust around the keycaps. Work between the rows and guide debris away from the switch openings rather than pushing it deeper inside.
A suitable vacuum can also help remove loosened debris. Use light pressure and avoid forcing a nozzle against delicate components.
Step 3: Wipe the Keycaps
Use a clean microfiber cloth that is only slightly damp. The cloth should never be wet enough to drip.
Wipe the tops and sides of the keycaps. Then use a dry section of the cloth to remove remaining moisture.
Step 4: Let the Keyboard Dry
Give the keyboard time to dry before reconnecting it. If any moisture could have entered the spaces around the switches, allow additional drying time.
How to Deep Clean a Mechanical Keyboard
A deep clean gives you access to areas hidden beneath the keycaps. It takes longer, but it is the better option when dust and grime have accumulated around the switches.
Step 1: Remove the Keycaps
Use a suitable keycap puller and pull each keycap straight upward with controlled pressure. Avoid twisting the keycaps from side to side.
Start from one section and work methodically across the keyboard. Place removed keycaps in a container so they do not roll away or become mixed with other parts.
Pay particular attention to large stabilized keys such as the spacebar, Enter, Shift, and Backspace. Their stabilizer hardware can make removal and reinstallation different from smaller keys.
Step 2: Inspect the Keyboard
With the keycaps removed, inspect the keyboard before cleaning it. Look for crumbs, hair, dust, sticky residue, or signs of a previous spill.
This inspection also helps determine whether a standard clean is enough. If the PCB or other internal components show signs of liquid damage, stop before introducing more moisture.
Step 3: Remove Loose Debris
Use a soft brush or suitable dust-removal method to loosen debris from the plate and areas around the switches.
Work gently. Mechanical switches contain small components, so aggressive brushing can cause unnecessary damage.
Step 4: Clean the Keyboard Case
Wipe the keyboard case with a microfiber cloth that is only lightly dampened. Keep the liquid on the cloth rather than applying it directly to the keyboard.
Pay attention to the edges of the case, corners, wrist-contact areas, and spaces where fingerprints and skin oils accumulate.
Step 5: Clean Around the Switches
Use a soft brush to remove remaining dust around the switch housings. For stubborn residue, a cotton swab lightly dampened with an appropriate cleaning solution can provide more control.
Do not flood the switch area. Small amounts of controlled moisture are easier to manage than liquid that can run into the keyboard.
How to Wash Mechanical Keyboard Keycaps
Detached keycaps can usually be cleaned separately with warm water and a small amount of mild dish soap. The keyboard itself should never be treated like a washable plastic object.
Step 1: Prepare Warm Water
Fill a clean bowl with warm water. Avoid very hot or boiling water because excessive heat can deform some plastic keycaps.
Step 2: Add Mild Soap
Add a small amount of mild dish soap and mix it into the water. You do not need a large amount of detergent.
Step 3: Soak the Keycaps
Place the detached keycaps into the solution. Let them soak long enough for surface oils and grime to loosen.
For ordinary dirt, a short soak is often sufficient. Heavily soiled keycaps may need more time.
Step 4: Rinse Thoroughly
Rinse the keycaps with clean water until no soap residue remains. Residue can leave the keycaps feeling slippery or sticky.
Step 5: Dry the Keycaps Completely
Drying is one of the most important parts of the process. Place the keycaps somewhere clean and well ventilated until water has completely evaporated.
Pay attention to the inside of each keycap stem. Water can remain hidden there even when the outside feels dry.
Important drying rule: Never reinstall damp keycaps. Hidden moisture can transfer into areas around the switches and electronics.
How to Clean Mechanical Keyboard Switches
For routine maintenance, clean around the switch rather than attempting to disassemble every switch. Switches contain small parts that can be damaged by excessive force or liquid.
Start with a dry cleaning method. Remove loose debris with a soft brush or suitable dust-removal tool.
If a switch has sticky residue, use a controlled amount of appropriate cleaning solution on a cotton swab. Do not pour liquid directly into the switch housing.
If a switch remains faulty after careful cleaning, the problem may not be dirt. A damaged switch, contact problem, or PCB fault may require repair or replacement.
Can You Use Isopropyl Alcohol to Clean a Mechanical Keyboard?
Isopropyl alcohol can be useful for removing stubborn residue from suitable keyboard surfaces, but the keyboard manufacturer’s instructions should come first.
Apply the alcohol to a cloth or cotton swab instead of spraying or pouring it onto the keyboard. Use only enough to clean the affected area.
Higher-concentration isopropyl alcohol can evaporate quickly, but that does not make excessive liquid safe. Keep the application controlled and allow the keyboard to dry fully.
Also check the manufacturer’s guidance for painted surfaces, printed legends, coatings, and specialty keycaps before using alcohol.
Can You Clean a Mechanical Keyboard With Water?
You can use water to clean detached keycaps, but you should not wash the powered keyboard itself.
Water works well for keycaps because they can be removed from the electronics. The keyboard base contains electrical components that require a much more controlled cleaning method.
Use warm rather than hot water for removable keycaps. Afterward, rinse away soap and wait until every keycap is completely dry.
Can You Wash a Mechanical Keyboard?
No, you should not wash the assembled mechanical keyboard under running water or submerge it. The safer approach is to remove the keycaps and clean them separately.
The keyboard base should receive controlled surface cleaning instead. Keep liquid away from the PCB and other electronics.
How to Clean a Dirty Mechanical Keyboard
A very dirty keyboard needs a more methodical approach. Start by removing the power and keycaps, then separate the cleaning tasks into the keycaps, exposed keyboard surface, and stubborn residue.
Do not rush through the drying stage. A thorough clean is only successful when the keyboard is safe to reconnect.
How to Clean a Gaming Keyboard
A mechanical gaming keyboard can usually follow the same basic cleaning process as another mechanical keyboard. RGB lighting does not change the main rule: keep liquid away from the electronics.
Remove the keycaps when necessary, clean the exposed areas gently, and make sure everything is dry before powering the keyboard again.
If the keyboard uses a special switch design or manufacturer-specific construction, check its manual before removing unusual components.
Can You Use This Method on a Gaming Laptop Keyboard?
A gaming laptop keyboard requires more caution because the keyboard is integrated into the laptop. Do not treat it like a detachable mechanical keyboard.
For a laptop, focus on surface cleaning and controlled debris removal. Follow the laptop manufacturer’s instructions before attempting to remove individual keys.
If you are building a complete home workstation, keeping the surrounding desk clean also helps reduce dust and debris around your keyboard. A well-organized home computer desk can make regular maintenance easier.
What Not to Use on a Mechanical Keyboard
The wrong cleaning method can create more problems than the original dirt. Avoid anything that introduces unnecessary heat, moisture, abrasion, or harsh chemicals.
- Boiling water: Excessive heat can deform some keycap plastics.
- Free-flowing liquid: Liquid can travel into switches and electronics.
- Bleach: Harsh chemicals can damage materials and finishes.
- Abrasive cleaners: Scrubbing compounds can scratch surfaces.
- Soaking the assembled keyboard: The electronics are not designed for this type of cleaning.
- Excessive heat: Heat can damage plastic parts and other components.
- Dirty or abrasive cloths: They can spread grime or scratch surfaces.
Always check the manufacturer’s cleaning instructions when they are available. Different keyboards can use different materials and coatings.
How to Reinstall Mechanical Keyboard Keycaps
Reinstall the keycaps only after both the keyboard and keycaps are completely dry.
Match the Original Layout
Use the photo you took before cleaning. Start with one section and work across the keyboard.
Align Each Keycap
Place each keycap directly over its switch stem. Press straight down until it seats correctly.
Do not force a keycap that does not align. Remove it, check the orientation, and try again.
Handle Stabilized Keys Carefully
Large keys may use stabilizer wires or other hardware. Make sure the stabilizer components are positioned correctly before pressing the keycap into place.
Test Every Key
Reconnect the keyboard after everything is dry. Test every key, including the spacebar, Enter, Shift, Backspace, and other large keys.
If one key does not work, check its seating and inspect the surrounding area before assuming the switch has failed.
How to Fix a Sticky Mechanical Keyboard Key
A sticky key is often caused by debris or residue, but cleaning does not fix every switch problem.
Start With the Keycap
Remove the affected keycap if the keyboard design allows it. Inspect the keycap and the area around the switch for visible debris.
Clean Around the Switch
Use a soft brush to remove loose debris. For stubborn residue, use a controlled amount of suitable cleaning solution on a cotton swab.
Test the Key Again
After cleaning and drying, reinstall the keycap and test it. If the key still sticks, the switch may have a mechanical problem.
A key that feels rough is different from a key that produces no input. The first may involve contamination, while the second can indicate a switch or electrical problem.
What to Do If You Spill Liquid on a Mechanical Keyboard
A liquid spill requires a different response from routine cleaning. The first priority is to remove power before testing whether the keyboard still works.
Act Immediately
- Disconnect the keyboard from power.
- Turn off a wireless keyboard.
- Position the keyboard so liquid can drain away from sensitive areas.
- Do not reconnect it to test it immediately.
- Remove affected keycaps if appropriate.
- Clean visible residue only after the immediate spill has been controlled.
- Allow adequate drying time before testing.
Spill warning: Do not power on a wet keyboard just to see whether it still works. Testing too early can turn a recoverable spill into permanent damage.
Water Spills
Plain water usually leaves less residue than a sugary drink, but it can still cause problems while the keyboard is wet.
Coffee and Tea
Coffee and tea can leave residue after the liquid evaporates. After the keyboard is safely disconnected and dry enough to handle, inspect the affected area and clean remaining residue carefully.
Soda and Other Sugary Drinks
Sugary drinks create a more difficult cleanup because dried sugar can remain sticky. Affected switches and stabilizers may require more detailed cleaning.
If a large amount of liquid entered the keyboard, professional repair may be safer than attempting extensive disassembly without experience.
How Often Should You Clean a Mechanical Keyboard?
Most people should clean a mechanical keyboard regularly rather than wait for visible grime to become severe.
- Light use: A quick clean every few weeks may be enough.
- Daily office use: A weekly surface clean works well for many users.
- Heavy gaming: Clean more often when dust, sweat, or food debris builds up quickly.
- Shared keyboards: Clean frequently because more people handle the same surface.
- Dusty environments: Increase the cleaning frequency when dust accumulates quickly.
The right schedule depends on your environment and usage. If you can see debris or notice sticky keys, do not wait for the next scheduled cleaning.
How Long Does It Take to Clean a Mechanical Keyboard?
A quick mechanical keyboard clean can take only a few minutes. Removing and washing the keycaps takes longer because drying becomes part of the process.
| Cleaning level | Typical task | Time involved |
|---|---|---|
| Quick clean | Dust removal and surface wipe | About 5–10 minutes |
| Standard clean | Keycap removal and cleaning | About 20–40 minutes of active work |
| Deep clean | Heavy grime, residue, or spill cleanup | Longer, depending on the condition |
The active cleaning time does not include the full drying period. Always allow enough time for moisture to evaporate before reconnecting the keyboard.
How to Keep a Mechanical Keyboard Cleaner for Longer
Good habits reduce how often you need to perform a deep clean.
- Wash your hands before long typing sessions.
- Avoid eating directly over the keyboard.
- Keep drinks away from the keyboard.
- Dust the surrounding desk regularly.
- Use a keyboard cover when storing the keyboard for long periods.
- Clean visible debris before it becomes compacted around the switches.
- Keep cleaning supplies nearby so quick maintenance takes less effort.
Your keyboard is part of the larger workspace. If you are comparing desk setups, a home office desk designed for a multi-monitor setup can also provide more room to keep peripherals organized and away from clutter.
When Should You Replace a Switch Instead of Cleaning It?
Cleaning is worth trying when a switch feels sticky, gritty, or sluggish. However, cleaning cannot repair every mechanical or electrical failure.
Consider switch replacement or professional repair when a key remains nonfunctional after careful cleaning, the switch has physical damage, or the keyboard has a confirmed electrical fault.
If only one key behaves differently from the others, compare its physical movement and input response with nearby keys. That can help determine whether the problem is dirt, the switch, or another component.
Frequently Asked Questions About Cleaning a Mechanical Keyboard
How do I clean a mechanical keyboard?
Turn it off, disconnect it, remove loose debris, and wipe the surface with a controlled amount of moisture. For deeper cleaning, remove the keycaps, wash them separately, clean around the switches, dry everything completely, and reinstall the keycaps.
Can you clean a mechanical keyboard with water?
You can use warm water to clean detached keycaps. Do not rinse or submerge the assembled keyboard because water can reach the electronics.
Can you wash a mechanical keyboard?
No. Do not wash the assembled keyboard under running water or submerge it. Clean the removable keycaps separately instead.
Can I clean a mechanical keyboard without removing the keycaps?
Yes. A soft brush, suitable vacuum, and lightly dampened microfiber cloth can handle routine cleaning without keycap removal.
How often should I clean a mechanical keyboard?
Clean it whenever visible debris or sticky residue appears. For regular users, a quick surface clean every week or two is a practical starting point.
How long does it take to clean a mechanical keyboard?
A quick clean can take about 5 to 10 minutes. A standard keycap clean usually requires more active work plus additional drying time.
Can I wash mechanical keyboard keycaps?
Yes, removable keycaps can usually be washed separately with warm water and mild soap. Rinse them thoroughly and let them dry completely before reinstalling them.
Can I use isopropyl alcohol on a mechanical keyboard?
It can be suitable for certain surfaces and residue, but follow the keyboard manufacturer’s instructions. Apply a controlled amount to a cloth or cotton swab instead of pouring it directly onto the keyboard.
Is it safe to use disinfecting wipes on a mechanical keyboard?
It depends on the keyboard material and the wipe’s ingredients. Avoid excessive moisture and harsh chemicals, and check the manufacturer’s cleaning instructions before using disinfectants.
How do I clean a gaming keyboard?
If it is a mechanical gaming keyboard, use the same basic cleaning process. Turn it off, remove debris, clean the keycaps and keyboard surface carefully, and keep moisture away from the electronics.
How do I clean a gaming laptop keyboard?
Use greater caution because the keyboard is integrated into the laptop. Follow the laptop manufacturer’s instructions and avoid treating it like a removable mechanical keyboard.
What should I do if a mechanical keyboard key remains sticky after cleaning?
Inspect the switch and surrounding area again after everything is dry. If the key remains sticky or fails to register, the switch or another internal component may need repair or replacement.
Should I remove every keycap when cleaning?
No. Remove keycaps when you need access to debris underneath them or when the keyboard needs a deeper clean. Routine maintenance can often be done without removing them.
Can I use compressed air to clean a mechanical keyboard?
Compressed air can help remove loose debris, but use it carefully and follow the keyboard manufacturer’s instructions. Avoid forcing debris deeper into the keyboard and never use a wet or contaminated air source.
What is the best way to clean mechanical keyboard keycaps?
Remove the keycaps, soak them in warm water with a small amount of mild soap, rinse away the residue, and let them dry completely before reinstalling them.
Final Thought
The best way to clean a mechanical keyboard is to match the cleaning method to the amount of dirt. Start with a quick dry clean for routine maintenance, remove the keycaps for deeper cleaning, and keep all moisture away from the electronics.
- For routine maintenance: Brush, remove debris, and wipe the keycaps.
- For a deeper clean: Remove and separately wash the keycaps, then clean the exposed keyboard carefully.
- For sticky keys: Clean around the affected switch before considering repair or replacement.
- After a spill: Disconnect power immediately and do not test the keyboard while it is still wet.
With a short cleaning routine and careful handling, your mechanical keyboard can stay cleaner, more comfortable, and easier to maintain.